letsencrypt 와일드카드 인증서 발급 및 MariaDB 설치하기
HTTPS 접속에 필수적인 letsencrypt를 설치하고 와일드카드 인증서를 발급받을 수 있습니다. MariaDB를 설치하고 기본적인 셋팅을 합니다.
1. letsencrypt를 통해 SSL 인증서 발급받기
보통 1개의 도메인만 발급 받는 경우가 많은데요. (예를들면 aced.ga 하나)
추후 확장성 및 관리의 용이성을 위해 Wildcard SSL 인증서를 받을 것입니다.
aced.ga와 *.aced.ga가 가능한거죠. 나중에 blog.aced.ga 라든지, bbs.aced.ga 모두 하나의 인증서로 SSL 연결이 가능합니다.
클라우드 플레어에서만 설정하면 바로 발급되므로 추천드립니다.
인증서 발급 패키지인 certbot을 먼저 설치합니다.
sudo apt install certbot위 명령어를 넣고 y엔터 후 바로 설치됩니다.
sudo certbot certonly --manual --preferred-challenges=dns --email youremail@email.com --server https://acme-v02.api.letsencrypt.org/directory --agree-tos -d yourdomain.com -d *.yourdomian.com이제 위와 같은 형식으로 넣어주면 됩니다.
youremail@email.com은 반드시 자신의 이메일로 바꿔주시고,
yourdomain.com 도 자신의 도메인으로 바꿔주세요.
위 명령어를 자신에게 맞게 수정 후 넣으면
Saving debug log to /var/log/letsencrypt/letsencrypt.log Plugins selected: Authenticator manual, Installer None
Would you be willing to share your email address with the Electronic Frontier Foundation, a founding partner of the Let’s Encrypt project and the non-profit organization that develops Certbot? We’d like to send you email about our work encrypting the web, EFF news, campaigns, and ways to support digital freedom.
(Y)es/(N)o:
위와 같이 이메일 주소를 공유할거냐 물어보는데, 원하시면 y 엔터 누르시면 됩니다.
Obtaining a new certificate Performing the following challenges: dns-01 challenge for aced.ga dns-01 challenge for aced.ga
NOTE: The IP of this machine will be publicly logged as having requested this certificate. If you’re running certbot in manual mode on a machine that is not your server, please ensure you’re okay with that.
Are you OK with your IP being logged?
(Y)es/(N)o:
그리고 위와 같이 물어보는데 y 엔터를 누릅니다.
Please deploy a DNS TXT record under the name _acme-challenge.aced.ga with the following value:
YeVmGJHxJ6UPbRbcJU어쩌고저쩌고
Before continuing, verify the record is deployed.
Press Enter to Continue
이제 클라우드플레어https://cloudflare.com 접속해서 DNS 부분에 들어갑니다.
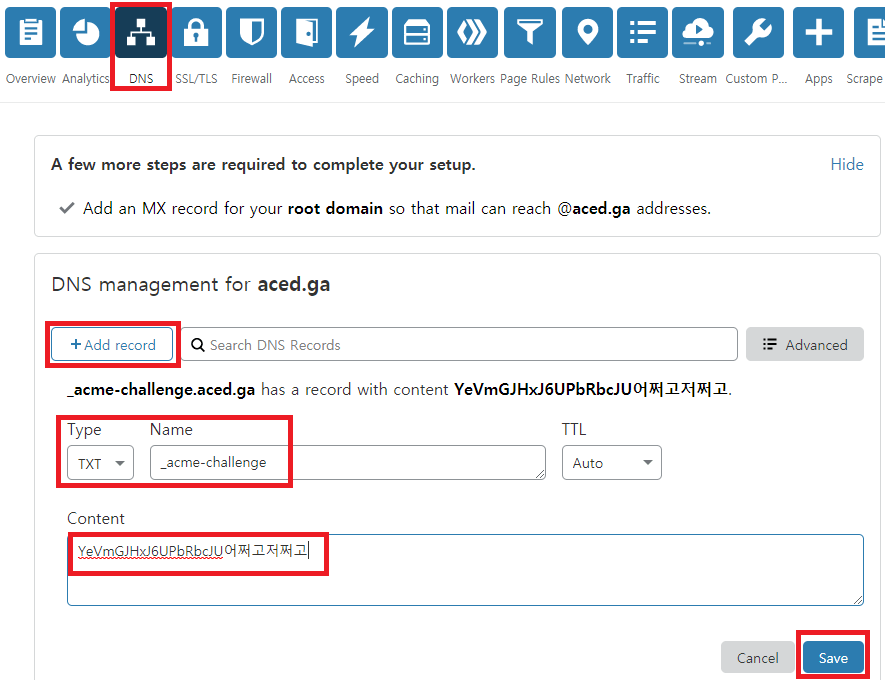
위와 같이 +Add record를 누르르고 Type에는 TXT, Name에는 _acme-challenge 를 넣고 Content에 YeVmGJHxJ6UPbRbcJU어쩌고저쩌고 를 넣고 Save를 누릅니다.
참고로 ‘YeVmGJHxJ6UPbRbcJU어쩌고저쩌고’ 는 타이핑하는게 아니라 SSH 화면 부분을 마우스로 긁으면 자동으로 복사됩니다. 그리고 컨트롤+V를 누르면 붙여넣기가 됩니다.
그리고 아까 인증서를 발급 받는 곳으로 돌아가서 엔터를 누릅니다.
Please deploy a DNS TXT record under the name _acme-challenge.aced.ga with the following value: yVOwRCb3yn5QUujoJ93-BDOyXs2Q어쩌고저쩌고저쩌고2 Before continuing, verify the record is deployed. (This must be set up in addition to the previous challenges; do not remove, replace, or undo the previous challenge tasks yet. Note that you might be asked to create multiple distinct TXT records with the same name. This is permitted by DNS standards.)
Press Enter to Continue
아까와 똑같이 +Add record를 누르르고 Type에는 TXT, Name에는 _acme-challenge 를 넣고 Content에 yVOwRCb3yn5QUujoJ93-BDOyXs2Q어쩌고저쩌고저쩌고2 를 넣고 Save를 누릅니다.
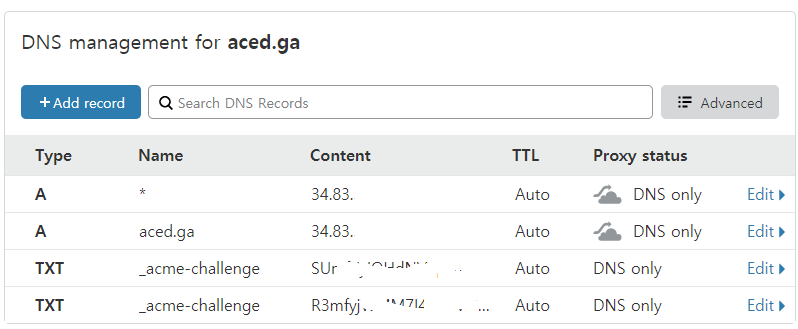
그러면 대략 위와 같은 화면으로 구성이 됩니다. (Content 부분은 수정하였습니다.)
다시 SSH 창으로 돌아와서 엔터를 누릅니다.
그러면
Waiting for verification… Cleaning up challenges
IMPORTANT NOTES:
Congratulations! Your certificate and chain have been saved at: /etc/letsencrypt/live/aced.ga/fullchain.pem Your key file has been saved at: /etc/letsencrypt/live/aced.ga/privkey.pem Your cert will expire on 2020-08-26. To obtain a new or tweaked version of this certificate in the future, simply run certbot again. To non-interactively renew all of your certificates, run “certbot renew”
Your account credentials have been saved in your Certbot configuration directory at /etc/letsencrypt. You should make a secure backup of this folder now. This configuration directory will also contain certificates and private keys obtained by Certbot so making regular backups of this folder is ideal.
If you like Certbot, please consider supporting our work by:
Donating to ISRG / Let’s Encrypt: https://letsencrypt.org/donate Donating to EFF: https://eff.org/donate-le
위와 같이 성공적으로 발급이 되었습니다.
Your certificate and chain have been saved at: /etc/letsencrypt/live/aced.ga/fullchain.pem Your key file has been saved at: /etc/letsencrypt/live/aced.ga/privkey.pem
여기서 위 내용이 매우매우매우 중요합니다. 와일드카드 인증서의 경로를 알려주는데요.
다음에 Nginx SSL에 매우 필수적인 경로입니다. 이 경로는 꼭 저장해주시는게 좋습니다.
그런데 인증서 유효기간이 3달 밖에 되지 않기 때문에 매일 갱신 도전을 하도록 하면 만료될 일이 없습니다.
crontab -e위 명령어를 내려서 자동 명령어를 등록해줍니다.
no crontab for root - using an empty one
Select an editor. To change later, run ‘select-editor’.
1. /bin/nano <---- easiest
2. /usr/bin/vim.basic
3. /usr/bin/vim.tiny
4. /bin/ed
위와 같은 내용이 나올 수 있는데. 1 엔터 누르면 됩니다.
0 1 * * * certbot renew --post-hook 'service nginx restart;' >> /var/log/letsencrypt/renew.log위와 같이 넣고 컨트롤+O 엔터, 컨트롤+X 를 누르면 매일 새벽 1시에 갱신 명령을 자동으로 내리고, 갱신이 성공하면 nginx를 자동으로 재시작하여 적용됩니다.
보통 만료 한달 전부터 갱신이 가능하기 때문에 7월 26일이 되면 자동으로 갱신될 것입니다.
2. MariaDB 설치하기
ghost 플랫폼이나 그누보드, 워드프레스에서는 데이터베이스 역할을 해주는 패키지가 필요합니다.
보통 Mysql로 대표되는데요. 요새는 MariaDB가 대세라서 깔아주겠습니다.
sudo apt install mariadb-server mariadb-client위 명령어로 서버와 클라이언트를 깔아줍니다.
sudo mysql_secure_installation위 명령어로 MariaDB를 설정해줍니다.
NOTE: RUNNING ALL PARTS OF THIS SCRIPT IS RECOMMENDED FOR ALL MariaDB SERVERS IN PRODUCTION USE! PLEASE READ EACH STEP CAREFULLY!
In order to log into MariaDB to secure it, we’ll need the current password for the root user. If you’ve just installed MariaDB, and you haven’t set the root password yet, the password will be blank, so you should just press enter here.
Enter current password for root (enter for none):
위와 같은 내용이 나오는데, 처음이기 때문에 비번이 없어 그냥 엔터만 칩니다.
OK, successfully used password, moving on…
Setting the root password ensures that nobody can log into the MariaDB root user without the proper authorisation.
Set root password? [Y/n]
위와 같이 나오는데 Y 엔터를 누릅니다.
그러면 root의 비번을 생성합니다. MariaDB 전용 root의 비번이기 때문에 꼭 기억하셔야 합니다.
New password: Re-enter new password: Password updated successfully! Reloading privilege tables.. … Success!
위와 같이 비번을 쳐도 표시가 안됩니다.
보안때문에 그렇겠죠? 안보이는게 당연하니, 당황하지 마세요
By default, a MariaDB installation has an anonymous user, allowing anyone to log into MariaDB without having to have a user account created for them. This is intended only for testing, and to make the installation go a bit smoother. You should remove them before moving into a production environment.
Remove anonymous users? [Y/n]
익명유저를 삭제하겠냐고 물어보는데 Y 엔터를 누릅니다.
… Success!
Normally, root should only be allowed to connect from ‘localhost’. This ensures that someone cannot guess at the root password from the network.
Disallow root login remotely? [Y/n]
위와 같이 원격 접속을 막는 것이 좋습니다. Y 엔터를 누릅니다.
… Success!
By default, MariaDB comes with a database named ‘test’ that anyone can access. This is also intended only for testing, and should be removed before moving into a production environment.
Remove test database and access to it? [Y/n]
test DB가 있는데 삭제하는게 좋습니다. Y 엔터
Dropping test database… … Success!
Removing privileges on test database… … Success!
Reloading the privilege tables will ensure that all changes made so far will take effect immediately.
Reload privilege tables now? [Y/n]
재시작하겠습니다. Y 엔터
… Success!
Cleaning up…
All done! If you’ve completed all of the above steps, your MariaDB installation should now be secure.
Thanks for using MariaDB!
이제 설정이 완료되었습니다.
sudo mysql -u root -p위 명령어를 넣고 아까 설정한 root 비번을 넣으면 MariaDB로 접속할 수 있습니다.
Enter password: Welcome to the MariaDB monitor. Commands end with ; or \g. Your MariaDB connection id is 55 Server version: 10.3.22-MariaDB-1ubuntu1 Ubuntu 20.04
Copyright (c) 2000, 2018, Oracle, MariaDB Corporation Ab and others.
Type ‘help;’ or ‘\h’ for help. Type ‘\c’ to clear the current input statement.
MariaDB [(none)]>
위와 같이 접속된 것을 알 수 있습니다.
접속에서 나오려면 exit를 넣고 엔터치면 됩니다.
MariaDB에 기본 이모지 출력을 위한 설정을 미리 합니다.
sudo touch /etc/mysql/conf.d/mariadb.cnf
sudo nano /etc/mysql/conf.d/mariadb.cnf
위 두 명령어로 설정파일을 생성합니다.
[client]
default-character-set=utf8mb4

[mysql]
default-character-set=utf8mb4

[mysqld]
collation-server = utf8mb4_unicode_ci
character-set-server = utf8mb4
collation_server = utf8mb4_unicode_ci
character_set_server = utf8mb4
위 내용을 그대로 넣습니다. 컨트롤 + O, 엔터, 컨트롤 + X로 저장합니다.
sudo service mysql restart위 명령어로 MariaDB를 재시작합니다.
sudo shutdown now -r위 명령어로 서버를 재부팅해줍니다.
다음에는 Nodejs와 ghost 플랫폼 설치를 해보겠습니다.
참조 사이트
오라클 클라우드에서 우분투 LEMP - MariaDB 설치하기

